서버 장비의 네트워크 트래픽을 모니터링하기 위해 이런저런 툴을 알아보다 'iftop'이라는 툴을 알게 되었습니다. 'top' 명령이 서버의 CPU와 메모리 사용량을 모니터링하는 것처럼 'iftop'은 네트워크 인터페이스의 트래픽을 모니터링 할 수 있습니다.
네트워크 인터페이스를 통해 오고가는 트래픽을 프로토콜, 소스, 목적지 별로 분류하여 모니터링 할 수 있으며 다양한 형태의 응용을 할 수 있도록 옵션들이 제공됩니다.
iftop 명령어 설치
iftop 명령어가 설치되어 있지 않은 경우가 많으므로 수동으로 설치해야하는 경우가 많이 있습니다. 각 리눅스 배포판의 패키지 관리 도구를 이용해 쉽게 설치할 수 있습니다.
각 리눅스에 설치하기 위해서 루트 권한이 필요할 수 있습니다.
iftop 설치 - Centos
yum install iftopiftop 설치 - Ubuntu
apt-get install iftopiftop 사용법
iftop의 사용뻐은 iftop --help 혹은 iftop -h 명령을 통해 간단하게 확인할 수 있습니다.
$ sudo iftop -h
iftop: display bandwidth usage on an interface by host

Synopsis: iftop -h | [-npblNBP] [-i interface] [-f filter code]
[-F net/mask] [-G net6/mask6]

-h display this message
-n don't do hostname lookups
-N don't convert port numbers to services
-p run in promiscuous mode (show traffic between other
hosts on the same network segment)
-b don't display a bar graph of traffic
-B Display bandwidth in bytes
-i interface listen on named interface
-f filter code use filter code to select packets to count
(default: none, but only IP packets are counted)
-F net/mask show traffic flows in/out of IPv4 network
-G net6/mask6 show traffic flows in/out of IPv6 network
-l display and count link-local IPv6 traffic (default: off)
-P show ports as well as hosts
-m limit sets the upper limit for the bandwidth scale
-c config file specifies an alternative configuration file
-t use text interface without ncurses

Sorting orders:
-o 2s Sort by first column (2s traffic average)
-o 10s Sort by second column (10s traffic average) [default]
-o 40s Sort by third column (40s traffic average)
-o source Sort by source address
-o destination Sort by destination address

The following options are only available in combination with -t
-s num print one single text output afer num seconds, then quit
-L num number of lines to print

iftop, version 1.0pre4
copyright (c) 2002 Paul Warren <pdw@ex-parrot.com> and contributors
쉘에서 iftop 명령을 실행하면 네트워크 사용량에 대한 정보를 확인할 수 있습니다.
$ sudo iftop
iftop 명령은 시스템의 리소스를 모니터링하는 도구이기 때문에 실행하는데 루트권한이 필요할 수 있습니다.
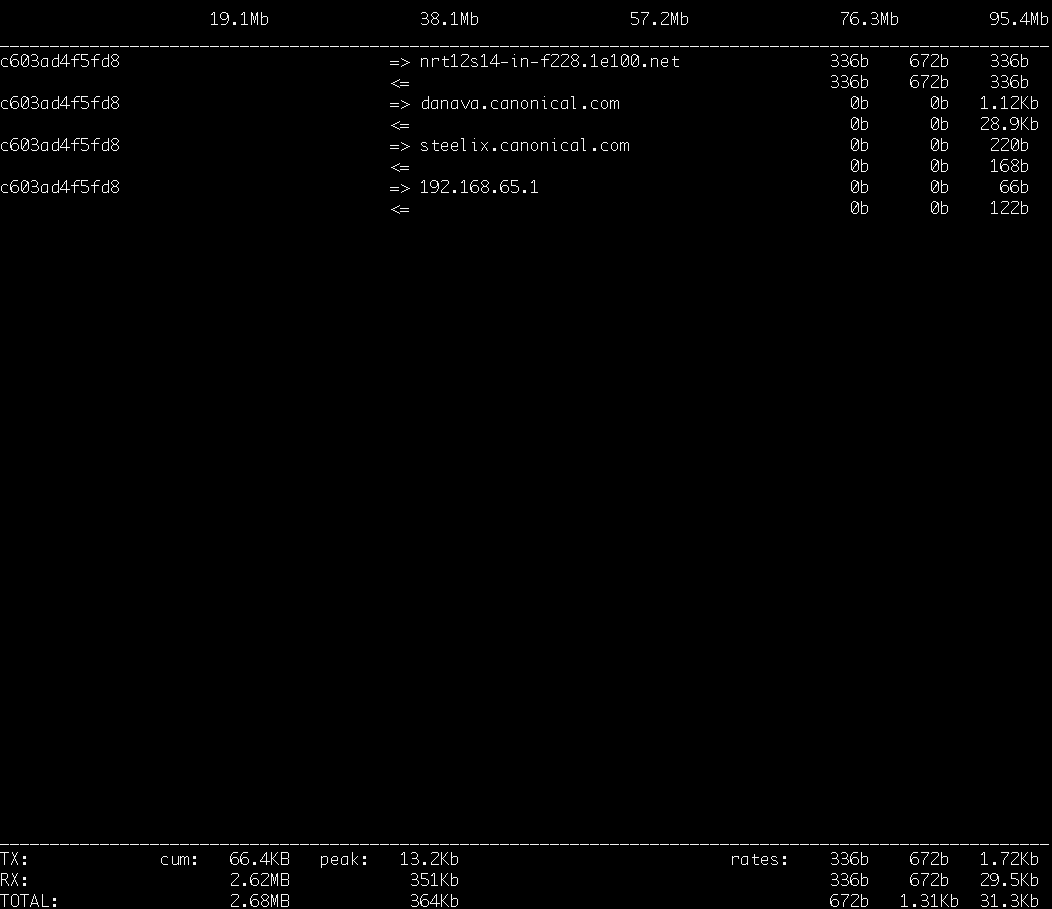
iftop에 별도의 옵션을 명시하지 않으면 서버 머신에 달려있는 첫 번째 네트워크 인터페이스를 기준으로 모니터링을 수행합니다. 화면에 나오는 여러 라인의 레코드들은 현재 접속중인 머신에서 통신을 하고 있는 호스트들과 그 호스트와의 통신에 대한 통계정보입니다.
각 라인의 첫 번째 항목은 현재 접속중인 머신의 호스트 네임 혹은 IP 주소를 의미합니다. 위 사진에서 'c603ad4f5fd8'라는 정보로 표시되고 있는 것이 현재 접속중인 머신의 호스트 정보입니다. 테스트를 위해 도커 환경에서 컨테이너를 띄운후 iftop 툴을 실행시킨거라 도커 컨테이너의 id가 호스트 정보에 표시되고 있습니다.
바로 다음 항목은 접속중인 머신이 통신하고 있는 대상의 호스트 네임 혹은 IP 주소를 의미합니다. 현재 접속해있는 머신이 서버라면 서버와 통신하고 있는 다른 서버 혹은 클라이언트의 정보가 이곳에 표시됩니다.
그 다음 항목들은 평균 전송량을 의미합니다. 첫 번째 항목은 2초, 두 번째가 10초, 세 번째가 40초 동안의 평균 전송량을 의미합니다.
화면 맨 아래쪽에 표시되는 정보는 네트워크 인터페이스 카드(NIC)를 통해 주고 받은 데이터의 양을 나타냅니다. 각 항목은 다음과 같은 의미를 갖습니다.
-
TX : 전송량 (Transmitting)
-
RX : 수신량 (Receiving)
-
TOTAL : 총량
각 항목들은 다음과 같은 서브 항목들로 세분화 됩니다.
-
cum : 누적 전송량
-
peak : 피크 상태일 때의 전송량
-
rates : 각각 2초/4초/10초간 평균 데이터 흐름
iftop 명령의 옵션
iftop -i {interface}
-i 옵션으로 모니터링 할 네트워크 인터페이스 이름을 명시할 수 있습니다.
$ sudo iftop -i eth0iftop -f {filter}
-f 옵션에 pcap-filter 형식의 필터링 문자열을 명시하여 모니터링하고 싶은 항목을 제한할 수 있습니다. (dst: Destination, src: Source) pcap-filter 형식은 대략적으로 다음과 같습니다.
-
dst host XXXX
-
src host XXXX
-
dst net XXXX
-
src net XXXX
-
dst port XXXX
-
src port XXXX
-
dst portrange start-end
-
src portrange start-end
-
gateway xxxx
-
ip proto protocol
자세한 내용은 PCAP-FILTER 매뉴얼 페이지를 참고 하시면 됩니다. (링크 : Manpage of PCAP-FILTER)
iftop -f 옵션은 다음과 같이 사용할 수 있습니다.
$ sudo iftop -i eth0 -f "dst host google.com"
$ sudo iftop -i eth1 -f "dst port 22"
이 필터 조건을 이용해서 원하는 호스트 혹은 원하는 포트를 사용하는 트래픽 통계만 뽑아 볼 수 있습니다.
인터랙티브 모드 단축키
iftop 명령을 실행시킨 상태에서 단축키들을 이용해 모니터링 표시 항목을 변경할 수 있습니다. 인터랙티브 모드에서의 단축키는 '?' 키를 입력하면 볼 수 있습니다.
Host display:
 n - toggle DNS host resolution
 s - toggle show source host
 d - toggle show destination host
 t - cycle line display mode

Port display:
 N - toggle service resolution
 S - toggle show source port
 D - toggle show destination port
 p - toggle port display

Sorting:
 1/2/3 - sort by 1st/2nd/3rd column
 < - sort by source name
 > - sort by dest name
 o - freeze current order

 General:
  P - pause display
  h - toggle this help display
  b - toggle bar graph display
  B - cycle bar graph average
  T - toggle cumulative line totals
  j/k - scroll display
  f - edit filter code
  l - set screen filter
  L - lin/log scales
  ! - shell command
  q - quit
설정파일
iftop 명령을 실행시킬 때 너무 많은 옵션을 주면 불편할 때가 있는데요. 따로 옵션으로 명시할 설정들을 파일로 만들어서 파일 경로만 입력하면 옵션을 한번에 다룰 수 있습니다.
기본적으로
/.iftoprc 파일에 설정 사항을 저장하면, iftop 명령 실행시 기본적으로 ~/.iftoprc 파일의 내용을 기준으로 동작하게 됩니다. (
/.bashrc 혹은 ~/.vimrc 파일의 동작원리를 생각해보면 이해하기 쉽습니다.)
혹은 iftop -c 옵션의 인자로 설정 파일을 넘겨줘도 됩니다.
$ sudo iftop -c <config file>설정 파일에 명시 할 수 있는 옵션들은 다양한데 자세한 내용은 'iftop manpage'를 확인해보면 됩니다. (링크 : iftop manpage)
댓글